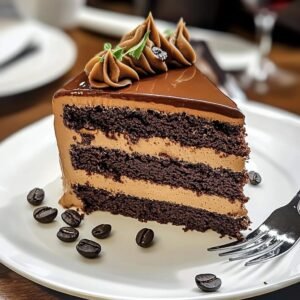
Decadent Hershey’s Chocolate Cake with Cream Cheese Filling & Buttercream
Print it, save it, or add it to your recipe binder.
Prepare to indulge in a chocolate lover’s dream! This Decadent Hershey’s Chocolate Cake with Cream Cheese Fillingis not just a cake; it’s an experience. We’re talking about incredibly moist, rich Hershey’s chocolate cake layers, generously filled with a tangy, sweet cream cheese filling, and then enveloped in a luscious chocolate cream cheese buttercream. It’s a triple threat of chocolate and cream cheese bliss that delivers on every promise of decadence. Perfect for birthdays, holidays, or any time you need an impressive dessert that will leave everyone asking for the recipe.
Why I Love This Recipe
This cake holds a special place in my heart because it combines all the elements of a truly show-stopping dessert with surprisingly straightforward steps. The Hershey’s chocolate cake recipe is legendary for a reason—it consistently bakes up incredibly moist with an intense chocolate flavor. But what truly elevates this cake for me are the two distinct cream cheese elements.
The pure, tangy cream cheese filling provides a wonderful contrast to the deep chocolate, preventing the cake from being overly sweet. Then, that glorious chocolate cream cheese buttercream acts as the perfect rich, yet balanced, blanket over the entire creation. It’s a sophisticated twist on classic flavors that feels incredibly celebratory. Making this cake is a labor of love that pays off in every single decadent bite, and it always gets rave reviews.
Ingredients
Here’s what you’ll need to create this magnificent chocolate masterpiece:
For the Cake:
- 2 cups sugar
- 1-3/4 cups all-purpose flour
- 3/4 cup Hershey’s Cocoa (unsweetened natural cocoa powder)
- 1-1/2 teaspoons baking powder
- 1-1/2 teaspoons baking soda
- 1 teaspoon salt
- 2 large eggs
- 1 cup milk (whole or 2%)
- 1/2 cup vegetable oil
- 2 teaspoons vanilla extract
- 1 cup boiling water
For the Cream Cheese Filling:
- 1 cup cream cheese, softened (full-fat brick cream cheese recommended)
- 1/2 cup powdered sugar (confectioners’ sugar)
- 1 teaspoon vanilla extract
For the Chocolate Cream Cheese Buttercream:
- 1/2 cup butter, softened (1 stick, unsalted preferred)
- 1/2 cup cream cheese, softened (full-fat brick cream cheese recommended)
- 3/4 cup Hershey’s Cocoa (unsweetened natural cocoa powder)
- 4 cups powdered sugar (confectioners’ sugar)
- 2 teaspoons vanilla extract
- 2-4 tablespoons milk (as needed, for consistency)
Swaps and Notes
- Hershey’s Cocoa: For this specific recipe, using Hershey’s unsweetened natural cocoa powder is recommended as the leavening agents (baking soda reacting with natural cocoa) are balanced for it. Dutch-processed cocoa may alter the texture.
- Milk: Any dairy or non-dairy milk can be used for the cake and frosting. Whole milk will yield a richer result.
- Vegetable Oil: Canola, sunflower, or any neutral-flavored oil works.
- Boiling Water: This thins the batter and helps bloom the cocoa, intensifying the chocolate flavor and creating a super moist cake. Don’t omit it!
- Cream Cheese: Always use full-fat block cream cheese, softened to room temperature, for best results in both fillings. Whipped or spreadable cream cheese will not work.
- Powdered Sugar: Sifting powdered sugar for the fillings is recommended to prevent lumps.
- Butter for Buttercream: Unsalted butter allows you to control the salt content. Make sure it’s softened, but not melted.
- Vanilla Extract: Use pure vanilla extract for the best flavor.
- Adjust Consistency (Buttercream): Add milk gradually to the buttercream until you reach a spreadable, pipeable consistency.

Decadent Hershey’s Chocolate Cake with Cream Cheese Filling & Buttercream
Prepare to indulge in a chocolate lover's dream! This
Prep: min | Cook: min | Total: min
Servings:
Ingredients
- 2 cups sugar
- 1-3/4 cups all-purpose flour
- 3/4 cup Hershey's Cocoa (unsweetened natural cocoa powder)
- 1-1/2 teaspoons baking powder
- 1-1/2 teaspoons baking soda
- 1 teaspoon salt
- 2 large eggs
- 1 cup milk (whole or 2%)
- 1/2 cup vegetable oil
- 2 teaspoons vanilla extract
- 1 cup boiling water
- 1 cup cream cheese, softened (full-fat brick cream cheese recommended)
- 1/2 cup powdered sugar (confectioners' sugar)
- 1 teaspoon vanilla extract
- 1/2 cup butter, softened (1 stick, unsalted preferred)
- 1/2 cup cream cheese, softened (full-fat brick cream cheese recommended)
- 4 cups powdered sugar (confectioners' sugar)
- 2-4 tablespoons milk (as needed, for consistency)
- Swaps and Notes:
- Hershey's Cocoa: For this specific recipe, using Hershey's unsweetened natural cocoa powder is recommended as the leavening agents (baking soda reacting with natural cocoa) are balanced for it. Dutch-processed cocoa may alter the texture.
- Milk: Any dairy or non-dairy milk can be used for the cake and frosting. Whole milk will yield a richer result.
- Vegetable Oil: Canola, sunflower, or any neutral-flavored oil works.
- Boiling Water: This thins the batter and helps bloom the cocoa, intensifying the chocolate flavor and creating a super moist cake. Don't omit it!
- Cream Cheese: Always use full-fat block cream cheese, softened to room temperature, for best results in both fillings. Whipped or spreadable cream cheese will not work.
- Powdered Sugar: Sifting powdered sugar for the fillings is recommended to prevent lumps.
- Butter for Buttercream: Unsalted butter allows you to control the salt content. Make sure it's softened, but not melted.
- Vanilla Extract: Use pure vanilla extract for the best flavor.
- Adjust Consistency (Buttercream): Add milk gradually to the buttercream until you reach a spreadable, pipeable consistency.
Instructions
- While this cake has multiple components, each step is straightforward, leading to a stunning final result.
- Preheat & : Prep Pans: Preheat your oven to 350°F (175°C). Grease and flour two 9-inch round baking pans. Ensure they are thoroughly coated to prevent sticking. You can also line the bottoms with parchment paper for extra insurance.
- Make the : Cake Batter: In a very large bowl, start by stirring together all the dry cake ingredients: sugar, all-purpose flour, Hershey's Cocoa, baking powder, baking soda, and salt. Use a whisk to ensure they're well combined. Add the wet ingredients: eggs, milk, vegetable oil, and vanilla extract. Beat the mixture on medium speed with an electric mixer for 2 minutes, scraping down the sides of the bowl as needed. Finally, carefully stir in the 1 cup of boiling water. The batter will be quite thin, which is normal for this recipe.
- Bake the : Cakes: Pour the thin cake batter evenly into your prepared 9-inch round baking pans. Bake for 30-35 minutes, or until a wooden toothpick inserted into the center of the cakes comes out clean.
- Cool : Cakes: Once baked, remove the pans from the oven and let the cakes cool in the pans for 10 minutes. This allows them to firm up slightly. After 10 minutes, carefully invert the cakes onto wire racks to cool completely. They must be entirely cool before you proceed with assembly, or your fillings will melt.
- Prepare : Cream Cheese Filling: While the cakes cool, make the simple cream cheese filling. In a medium bowl, beat the 1 cup softened cream cheese, 1/2 cup powdered sugar, and 1 teaspoon vanilla extract with an electric mixer until the mixture is smooth and creamy. Set aside.
- Prepare : Chocolate Cream Cheese Buttercream: In a large bowl, using an electric mixer, beat the 1/2 cup softened butter and 1/2 cup softened cream cheese together until the mixture is light and fluffy, about 2-3 minutes. Gradually add the 3/4 cup Hershey's Cocoa and 4 cups powdered sugar, beating well after each addition until fully incorporated. Stir in the 2 teaspoons vanilla extract. Now, add the milk, 1 tablespoon at a time, beating until you achieve your desired smooth, spreadable consistency.
- Assembly: Once the cake layers are completely cool, use a long, serrated knife to carefully cut each cake layer horizontally in half, creating a total of four cake layers. Place one cake layer on your serving plate or cake stand.
- Spread one-third of the cream cheese filling evenly over this layer.
- Place the second cake layer on top and spread with another one-third of the cream cheese filling.
- Add the third cake layer and spread with the remaining one-third of the cream cheese filling.
- Finally, top with the fourth cake layer.
- Use an offset spatula or knife to frost the entire cake (top and sides) with the chocolate cream cheese buttercream. For a smooth finish, use a bench scraper around the sides.
- Chill & : Serve: For best results and easier slicing, chill the cake in the refrigerator for at least 30 minutes to allow the fillings and frosting to set. Slice and serve this decadent delight!
Nutrition
- Calories:
- Fat:
- Carbs:
- Protein:
Rate This Recipe
Average Rating: 0 (0 votes)
Directions
While this cake has multiple components, each step is straightforward, leading to a stunning final result.
- Preheat & Prep Pans: Preheat your oven to 350°F (175°C). Grease and flour two 9-inch round baking pans. Ensure they are thoroughly coated to prevent sticking. You can also line the bottoms with parchment paper for extra insurance.
- Make the Cake Batter: In a very large bowl, start by stirring together all the dry cake ingredients: sugar, all-purpose flour, Hershey’s Cocoa, baking powder, baking soda, and salt. Use a whisk to ensure they’re well combined. Add the wet ingredients: eggs, milk, vegetable oil, and vanilla extract. Beat the mixture on medium speed with an electric mixer for 2 minutes, scraping down the sides of the bowl as needed. Finally, carefully stir in the 1 cup of boiling water. The batter will be quite thin, which is normal for this recipe.
- Bake the Cakes: Pour the thin cake batter evenly into your prepared 9-inch round baking pans. Bake for 30-35 minutes, or until a wooden toothpick inserted into the center of the cakes comes out clean.
- Cool Cakes: Once baked, remove the pans from the oven and let the cakes cool in the pans for 10 minutes. This allows them to firm up slightly. After 10 minutes, carefully invert the cakes onto wire racks to cool completely. They must be entirely cool before you proceed with assembly, or your fillings will melt.
- Prepare Cream Cheese Filling: While the cakes cool, make the simple cream cheese filling. In a medium bowl, beat the 1 cup softened cream cheese, 1/2 cup powdered sugar, and 1 teaspoon vanilla extract with an electric mixer until the mixture is smooth and creamy. Set aside.
- Prepare Chocolate Cream Cheese Buttercream: In a large bowl, using an electric mixer, beat the 1/2 cup softened butter and 1/2 cup softened cream cheese together until the mixture is light and fluffy, about 2-3 minutes. Gradually add the 3/4 cup Hershey’s Cocoa and 4 cups powdered sugar, beating well after each addition until fully incorporated. Stir in the 2 teaspoons vanilla extract. Now, add the milk, 1 tablespoon at a time, beating until you achieve your desired smooth, spreadable consistency.
- Assembly: Once the cake layers are completely cool, use a long, serrated knife to carefully cut each cake layer horizontally in half, creating a total of four cake layers.
- Place one cake layer on your serving plate or cake stand.
- Spread one-third of the cream cheese filling evenly over this layer.
- Place the second cake layer on top and spread with another one-third of the cream cheese filling.
- Add the third cake layer and spread with the remaining one-third of the cream cheese filling.
- Finally, top with the fourth cake layer.
- Use an offset spatula or knife to frost the entire cake (top and sides) with the chocolate cream cheese buttercream. For a smooth finish, use a bench scraper around the sides.
- Chill & Serve: For best results and easier slicing, chill the cake in the refrigerator for at least 30 minutes to allow the fillings and frosting to set. Slice and serve this decadent delight!
Pro Tips
- Room Temperature Ingredients: Ensure your eggs, milk, butter, and especially cream cheese are at room temperature. This helps with proper emulsification and prevents lumps in your batters and frostings.
- Don’t Overmix: For the cake, mix just until combined after adding wet ingredients. Overmixing can lead to a tough cake. For the frostings, beat until smooth and fluffy, but don’t overbeat once the powdered sugar is incorporated.
- Cool Completely: This is crucial! Warm cake will melt your fillings and frosting, leading to a messy assembly. Patience here pays off.
- Leveling Cakes: If your cake layers bake up with domes, use a serrated knife to carefully level the tops before cutting them horizontally. This creates stable, even layers.
- Crumb Coat: For a super neat final frosting, apply a thin “crumb coat” of the chocolate buttercream first. Chill the cake for 15-20 minutes, then apply the final, thicker layer of buttercream. This traps any loose crumbs.
Serving Suggestions and Pairings
This Hershey’s Chocolate Cake is a showstopper on its own, but a few simple additions can elevate the experience.
- Coffee or Milk: A classic pairing that complements the rich chocolate flavor.
- Fresh Berries: A side of fresh raspberries or strawberries provides a bright, tart contrast to the sweetness of the cake.
- Whipped Cream: A dollop of extra whipped cream, if you wish, can add another layer of lightness.
- Ice Cream: A scoop of vanilla bean ice cream or a scoop of mint chocolate chip ice cream would be a luxurious addition.
- Other Chocolate Delights: If you’re a chocolate fanatic, consider serving small portions of this cake alongside my These Chocolate Chip Cookie Dough Brownie Bombs Are My Favorite Sweet Obsession for a truly epic dessert spread.
Storage and Leftover Tips
This cake stores surprisingly well, making it a great make-ahead option.
- Storage: Store the frosted cake in an airtight cake carrier or under a cake dome in the refrigerator for up to 3-4 days. Allow it to come to room temperature for about 30 minutes before serving for the best texture and flavor.
- Freezing Cake Layers: Unfrosted cake layers can be wrapped tightly in plastic wrap and then foil, and frozen for up to 2-3 months. Thaw at room temperature before assembling.
- Freezing Frosted Cake: A fully frosted cake can be frozen. Place the cake (uncovered) in the freezer until the frosting is firm (about 1-2 hours). Then wrap tightly in plastic wrap and then foil. Store for up to 1 month. Thaw in the refrigerator overnight, then bring to room temperature before serving.
More Recipes You Will Love
If you loved indulging in this rich chocolate cake, you’ll definitely want to explore some of these other fantastic dessert recipes:
- For another incredible chocolate and peanut butter combo, check out The Best Peanut Butter Brownies I’ve Ever Made (and I’ve Made a Lot).
- If you’re a fan of no-bake treats, my This Grasshopper Pie Is My Favorite No-Bake Dessert with a Mint Chocolate Twist offers a refreshing minty chocolate experience.
- For a delightful twist on a classic, don’t miss This Chocolate Chip Banana Bread Is My Favorite Way to Use Up Overripe Bananas.
- And if you’re craving simple, timeless cookies, These Old School No-Bake Cookies Never Fail Me (and I’ve Made Them 100 Times) are a must-try.
Final Thoughts
This Hershey’s Chocolate Cake with Cream Cheese Filling is truly a masterpiece of comfort and indulgence. It’s a dessert that not only looks stunning but delivers on every promise of rich, moist chocolate and creamy, tangy goodness. It’s the perfect centerpiece for any celebration or simply when you want to treat yourself to something truly special. Dive in and savor every decadent bite!
What’s your ultimate chocolate dessert fantasy? Share your ideas in the comments below! And don’t forget to follow Chef Maniac for more delicious and show-stopping recipes that bring joy to your kitchen.