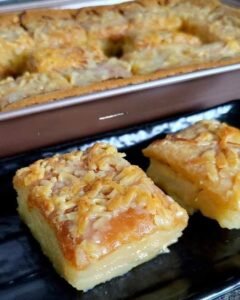
Royal Bibingka Recipe: A Rich & Cheesy Filipino Coconut Rice Cake
Print it, save it, or add it to your recipe binder.
Royal Bibingka (Filipino Coconut Rice Cake)
If you’re craving a dessert that’s comforting, creamy, and wonderfully nostalgic, this Royal Bibingka is the answer. A popular Filipino rice cake, this version is baked to golden perfection and topped with gooey cheese and condensed milk for an indulgent finish. Traditionally enjoyed during the holidays, it’s so easy and satisfying, you’ll want to bake it year-round.
Why I Love This Recipe
Growing up, bibingka was a staple during Christmas season in my Filipino-American household—but Royal Bibingka is the “deluxe” version. Think rich coconut flavor, a chewy-soft base, and that irresistible cheesy-sweet topping. It’s the perfect blend of East meets West, where condensed milk meets glutinous rice flour in sweet harmony.
Plus, it’s incredibly easy to prepare. No complicated steps. No special equipment. Just mix, bake, and enjoy!
Ingredients
For the Bibingka Base:
- 3 cups glutinous rice flour
- 1 can coconut milk
- ¾ can condensed milk (reserve the rest for topping)
- 1 cup evaporated milk
- 3 tablespoons melted butter
- 3 eggs
- ½ cup sugar
- ¼ teaspoon salt
- 1 teaspoon vanilla extract (optional but recommended)
For the Toppings:
- Remaining condensed milk
- Grated cheese (Cheddar or Edam/Queso de Bola are both delicious choices)
Swaps & Notes
- Cheese: Traditional recipes use salty cheeses like Edam or sharp cheddar. Feel free to experiment with gouda or even mozzarella for a milder melt.
- Sweetness: If you prefer a lighter dessert, reduce the sugar or skip the extra condensed milk drizzle.
- Gluten-free: Since it uses glutinous rice flour, this dessert is naturally gluten-free!
- Evaporated milk can be swapped with whole milk if needed.
Royal Bibingka Recipe: A Rich & Cheesy Filipino Coconut Rice Cake
Royal Bibingka (Filipino Coconut Rice Cake)
Prep: min | Cook: min | Total: min
Servings:
Ingredients
- For the Bibingka Base:
- 3 cups glutinous rice flour
- 1 can coconut milk
- ¾ can condensed milk (reserve the rest for topping)
- 1 cup evaporated milk
- 3 tablespoons melted butter
- 3 eggs
- ½ cup sugar
- ¼ teaspoon salt
- 1 teaspoon vanilla extract (optional but recommended)
- For the Toppings:
- Remaining condensed milk
- Grated cheese (Cheddar or Edam/Queso de Bola are both delicious choices)
Instructions
- Preheat : Oven: Set your oven to 350°F (175°C). Lightly grease a baking dish (9x13 inch works well) or line it with parchment paper.
- Mix : Wet Ingredients: In a large bowl, whisk together eggs, sugar, vanilla extract, and a pinch of salt. Add the melted butter, coconut milk, condensed milk (3/4 can), and evaporated milk. Stir until well blended.
- Add : Dry Ingredient: Gradually add glutinous rice flour to the wet mixture. Whisk or stir until the batter is smooth and lump-free. Strain through a fine mesh sieve if needed for extra silkiness.
- Bake – First Stage: Pour the batter into the prepared dish and bake for 30–35 minutes, or until the top is just set and lightly golden.
- Add : Toppings & Finish Baking: Remove from the oven, spread the remaining condensed milk on top, and generously sprinkle with grated cheese. Return to oven and bake for an additional 10–15 minutes, or until golden and bubbly.
- Cool & : Serve: Let the bibingka cool slightly before slicing. Enjoy warm or chilled—it’s fantastic either way!
Nutrition
- Calories:
- Fat:
- Carbs:
- Protein:
Rate This Recipe
Average Rating: 0 (0 votes)
Instructions
- Preheat Oven: Set your oven to 350°F (175°C). Lightly grease a baking dish (9×13 inch works well) or line it with parchment paper.
- Mix Wet Ingredients: In a large bowl, whisk together eggs, sugar, vanilla extract, and a pinch of salt. Add the melted butter, coconut milk, condensed milk (3/4 can), and evaporated milk. Stir until well blended.
- Add Dry Ingredient: Gradually add glutinous rice flour to the wet mixture. Whisk or stir until the batter is smooth and lump-free. Strain through a fine mesh sieve if needed for extra silkiness.
- Bake – First Stage: Pour the batter into the prepared dish and bake for 30–35 minutes, or until the top is just set and lightly golden.
- Add Toppings & Finish Baking: Remove from the oven, spread the remaining condensed milk on top, and generously sprinkle with grated cheese. Return to oven and bake for an additional 10–15 minutes, or until golden and bubbly.
- Cool & Serve: Let the bibingka cool slightly before slicing. Enjoy warm or chilled—it’s fantastic either way!
Tips for Success
- Don’t overbake: You want a slightly chewy, soft center. Check with a toothpick—it should come out mostly clean.
- Let it rest: Bibingka sets as it cools, so don’t skip the cooling step.
- Use full-fat coconut milk for a richer texture and flavor.
Serving Suggestions & Pairings
Royal Bibingka is rich on its own, but pairs wonderfully with lighter drinks and tropical flavors. Try it with:
- A glass of Blueberry Lemonade for a refreshing contrast
- A platter of Easy Coconut Macaroons for a coconut-lovers’ dessert board
- Or go indulgent with Pumpkin Delight Dessert for a sweet finish to a holiday meal
Storage & Leftovers
- Store leftovers in an airtight container at room temperature for 1 day or in the fridge for up to 4 days.
- To reheat, microwave slices for 20-30 seconds until just warm. The cheese topping melts beautifully again!
More Desserts You’ll Love:
- These Cake Mix Cookies Are My Go-To Shortcut for Easy, Foolproof Treats
- These Caramel Apple Nachos Are My Favorite Quick Fall Dessert Trick
- These Easy Turkey Wings Are My Favorite Comfort Food for Lazy Sundays
Final Thoughts
Royal Bibingka is more than just a dessert—it’s a celebration of culture, comfort, and flavor. Whether you’re sharing it with family during the holidays or whipping it up to surprise your coworkers, it always leaves a lasting impression.
Tried this recipe? Let me know what you think in the comments! Follow ChefManiac for more sweet and savory inspiration.