These BBQ Pulled Pork Mac ’n’ Cheese Bombs Are an Explosion of Flavor
Print it, save it, or add it to your recipe binder.
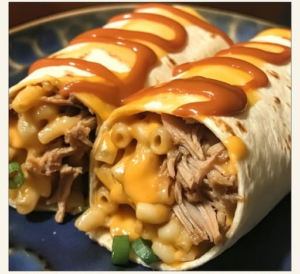
Let’s talk bold flavor. These Ghost Pepper BBQ Pulled Pork and Bacon Mac ‘n’ Cheese Bombs are fiery, crispy, cheesy orbs of pure indulgence. A decadent combo of smoky pulled pork, spicy BBQ sauce, creamy mac ’n’ cheese, and crunchy bacon—all rolled into bite-sized bombs, baked and fried to golden perfection. Whether you’re feeding a crowd or just yourself (we won’t judge), this spicy snack explodes with heat, texture, and flavor in every bite.
Why I Love This Recipe
There’s something thrilling about serving up a bite-sized dish that makes guests go “whoa.” These bombs are that dish. They’re spicy, smoky, creamy, and crunchy—all at once. The ghost pepper BBQ sauce brings the fire, but the cheese and milk sauce balance it beautifully. They’re a two-step flavor journey: baked to hold their shape, then flash-fried for that craveable crunch. It’s a bit of work, yes—but 100% worth it when you watch them vanish in seconds.
Ingredients
- 1 lb cooked pulled pork
- 6 slices bacon, cooked and crumbled
- 2 cups cooked macaroni noodles
- 1 cup shredded cheddar cheese
- ½ cup ghost pepper BBQ sauce
- ½ cup breadcrumbs
- ¼ cup butter, melted
For Cheese Sauce:
- ¼ cup flour
- ¼ cup butter
- 2 cups milk
- 1 cup shredded cheddar cheese
- Salt and pepper to taste
For Frying:
- Neutral oil (like vegetable or canola), for deep frying
Ingredient Swaps & Notes
- Don’t like extreme heat? Use regular BBQ sauce or a mix of mild and spicy sauces.
- Want more crunch? Add panko crumbs to the breading mix.
- No deep fryer? Use a Dutch oven and thermometer for safe frying.
- Make them bite-sized or jumbo—just adjust the bake and fry times accordingly.

These BBQ Pulled Pork Mac ’n’ Cheese Bombs Are an Explosion of Flavor
Ghost Pepper BBQ Pulled Pork and Bacon Mac 'n' Cheese Bombs
Prep: min | Cook: min | Total: min
Servings:
Ingredients
- 1 lb cooked pulled pork
- 6 slices bacon, cooked and crumbled
- 2 cups cooked macaroni noodles
- 1 cup shredded cheddar cheese
- ½ cup ghost pepper BBQ sauce
- ½ cup breadcrumbs
- ¼ cup butter, melted
- ¼ cup flour
- ¼ cup butter
- 2 cups milk
- Salt and pepper to taste
- Neutral oil (like vegetable or canola), for deep frying
Instructions
- Preheat oven to 375°F.
- In a large bowl, mix pulled pork, bacon, macaroni, shredded cheddar, and ghost pepper BBQ sauce.
- Form into golf ball-sized rounds and place on a baking sheet.
- In a small bowl, combine breadcrumbs and melted butter. Roll each ball in the mixture until fully coated.
- Bake for 15–20 minutes, until lightly crispy and set.
- While baking, make the cheese sauce: In a saucepan, melt butter and whisk in flour to form a roux.
- Slowly add milk while whisking, cooking until thickened.
- Stir in cheddar cheese until smooth. Season with salt and pepper.
- Heat oil to 350°F in a deep fryer or heavy pot.
- Fry baked mac bombs for 2–3 minutes until golden brown.
- Drain on paper towels, and serve hot with the cheese sauce for dipping.
Nutrition
- Calories:
- Fat:
- Carbs:
- Protein:
Rate This Recipe
Average Rating: 0 (0 votes)
How to Make Ghost Pepper Mac ’n’ Cheese Bombs
- Preheat oven to 375°F.
- In a large bowl, mix pulled pork, bacon, macaroni, shredded cheddar, and ghost pepper BBQ sauce.
- Form into golf ball-sized rounds and place on a baking sheet.
- In a small bowl, combine breadcrumbs and melted butter. Roll each ball in the mixture until fully coated.
- Bake for 15–20 minutes, until lightly crispy and set.
- While baking, make the cheese sauce:
- In a saucepan, melt butter and whisk in flour to form a roux.
- Slowly add milk while whisking, cooking until thickened.
- Stir in cheddar cheese until smooth. Season with salt and pepper.
- Heat oil to 350°F in a deep fryer or heavy pot.
- Fry baked mac bombs for 2–3 minutes until golden brown.
- Drain on paper towels, and serve hot with the cheese sauce for dipping.
Tips for Success
- Chill the formed mac bombs before baking if your mixture feels too soft—they’ll hold together better.
- Use leftover pulled pork or store-bought for a shortcut.
- Always test your oil temperature—too hot = burned outsides, raw insides.
- Want even more flavor? Add chopped jalapeños or green onions to the mix before forming.
Serving Suggestions & Pairings
Serve these bold bombs with:
- Beer Cheese Dip for a creamy, cheesy appetizer duo
- Sheet Pan Quesadillas to round out your party table
- Dorito Casserole for another crowd-pleasing comfort dish
- Crockpot Nacho Dip to add some creamy, spicy variety
- Cheesy Hot Dip to balance heat with nostalgia
Storage & Leftovers
- Fridge: Store cooled bombs in an airtight container for up to 3 days.
- Reheat: Air fryer or oven preferred—400°F for 5–7 minutes. Microwave works, but loses crispiness.
- Freezer: Freeze un-fried, baked bombs. Thaw, then fry fresh when ready to serve.
More Recipes You’ll Love
If you can’t get enough of bold, cheesy, snackable foods, try:
- Beer Cheese Dip – dippable, rich, and perfect with pretzels
- Sheet Pan Quesadillas – fast, cheesy, and customizable
- Crockpot Nacho Dip – set it and let the flavor happen
- Dorito Casserole – cheesy crunch in every layer
- Cheesy Hot Dip – comfort food in hot dip form
Final Thoughts
These Ghost Pepper BBQ Pulled Pork and Bacon Mac ‘n’ Cheese Bombs aren’t just appetizers—they’re flavor-packed experiences. Spicy, crispy, creamy, and comforting all at once, they’re the perfect way to wow your guests (or yourself). Just don’t forget the cheese sauce—and maybe a cold drink to cool the fire!